Why windows takes so long to start up.

Most of us have had a brand new computer at one time. It’s a great feeling. You boot up windows and within 30 seconds you are surfing the net, checking your email, or playing your favorite game. 10 months down the road things aren’t so nice anymore. You power up your computer and it seems to take forever to load.

Even when you are careful about what you install it seems that each day it takes longer for it to boot. It’s not your imagination – and there are a couple of good tips to keep your boot time short and sweet.

As always – backup your system before you start any of this. If you make a mistake you might need to restore from backup

There has been some controversy about the prefetch folder. I think this issue needs to be looked into. I did have a reputable source for this information: It was the “Windows XP Annoyances” book by O’Reilly. Page 210. Titled “Keeping an eye on prefetch”

1. The prefetch cache

The first tip I want to talk about is the windows prefetch. Windows XP has this feature that loads commonly used programs – at boot time.

Here is how it works: Yesterday you used MS Word, and Duke Nukem 3D. Today you boot your system to check e-mail. It sees parts of these two programs in the prefetch folder and loads them into memory before windows completes the boot process. The benefit is faster application launch times. If you really wanted to use MS Word, it would pop up really quick when you double clicked on it.

The problem is most people have been running windows for years, and the prefetch gets clogged with stuff that you almost never use. Windows takes forever to boot because it is prefetching a 1.0 copy of Napster, and you just want to check your email before you have to go to work.

What can be done about it? Well there are a few things we can do to tweak the prefetch cache. One method is to disable it partially, and this can be done quite easily.

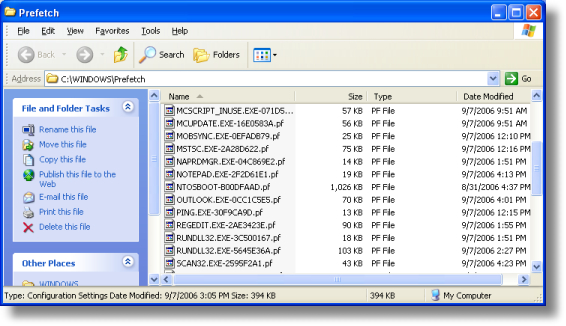
Simply browse to the windows folder (Ex: C:\Windows) and under there you should see the prefetch folder. Go into the prefetch folder and delete all the files (Careful! It should look like this c:\windows\prefetch) And here is a screenshot of one if you still have questions

The first thing to note is the next reboot will be slow. This is because windows needs to relearn the prefetch for system files. Subsequent boots will run much faster since the sludge of programs has been removed, and only new ones are in the cache.

The trouble is that it will only help you for a while – until the prefetch gets clogged up again. We need to edit a registry key to tweak it. Open regedit and browse to this key:

HKEY_LOCAL_MACHINE\SYSTEM\CurrentControlSet\Control\Session Manager\Memory Management\PrefetchParameters

Under this key you should see a value named: EnablePrefetcher

It has 4 possible values:

0 – Disabled : The prefetch system is turned off.

1 – Application : The prefetch only caches applications.

2 – Boot : The prefetch only caches boot system files.

3 – All : The prefetch caches boot, and application files.

We don’t want to disable it entirely. This would actually make boot times *longer*. This is because this feature is also used to speed up the loading of boot files. That is why we are going to pick the number 2 option. It allows us to keep the advantage of caching system files, without continually clogging the system up with applications.

Set the value to 2 and reboot.

The 2nd time you boot it should boot much faster. Remember that the side effect is that launching individual applications once windows has loaded will now be slightly slower.

2. Hard drive fragmentation

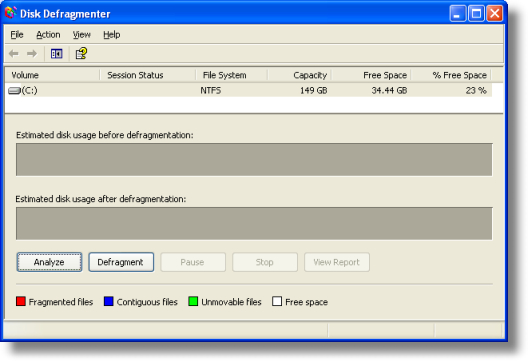
Over time your hard drive will become fragmented. An over simplified explanation of fragmentation is when your files and folders are not all stored in the same spot. For example lets say you had a large movie file. If it were fragmented the first 5 megabytes are at the beginning of the hard drive, and then next 5 are at the end. It takes longer for windows to read the file than it would if it were all in the same spot. The point is that if each file is stored in a linear fashion, and the drive does not have to move all over the place to read it – it will load faster. XP has a built-in defrag tool, and it is simple to run. Open “My Computer” right click on the boot drive, and go to properties. Now click on the tools tab.

Click “Defragment Now” and the following window should appear:

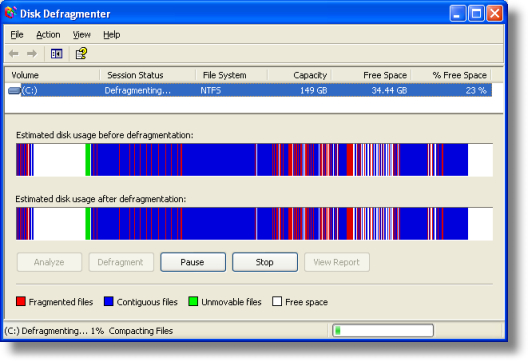
Before you click on the “Defragment” button you want to close all applications and be aware that it might take hours to complete. If you leave something running it might keep windows from completing the defragment operation.

Click on the defragment button and you can walk away. Or you can watch it defrag your hard drive:

3. Disconnected network drives

I am using networked drives all the time. If you have ever put your machine on a network and connected to a shared drive, this can slow you down too. If you have a drive that is still mapped, but cannot be reached it will slow down windows during boot time. This is because windows will wait…wait…and wait some more for the remote server to respond. To clean these out open “My Computer” and go to the tools menu. Click on “Disconnect Network Drives” It will open a window that looks like this:

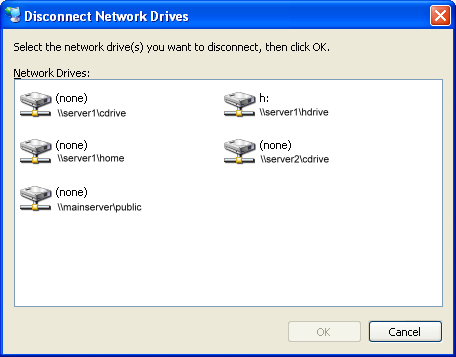
Click on the drives you no longer need, and click OK.

4. Spyware & Adware

These can have a big impact on your start times. If your PC gets loaded with spyware, it spends a large portion of its boot time making sure those pesky programs are loaded and ready to throw popup adverts at you all day. To check and clean your system of spyware there are three free programs that I highly recommend:

1. Microsoft Windows Defender

2. Ad-Aware

3. SpyBot Search And destroy

5. File and Printer Sharing

One other item that can significantly impact is the “File and Printer Sharing” feature within windows. Obviously, if you are sharing your printer, or folders you don’t want to disable this – so this tip is not for you. If you never use it, then why waste your time waiting for it to load?

Here is how to turn it off:

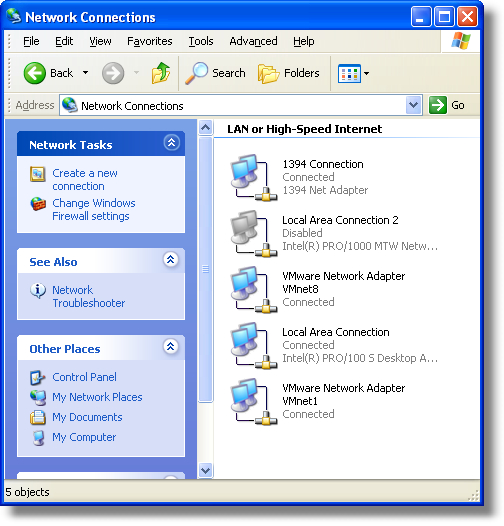
Go into the control panel. Click on “Network Connections”

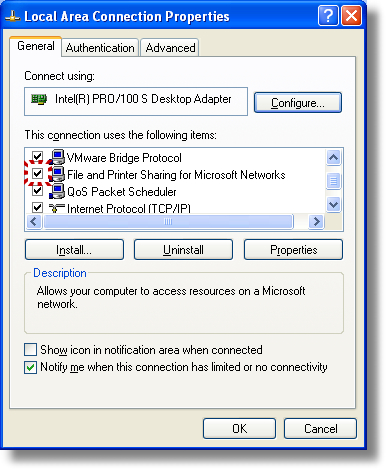
Now right click on “Local Area Connection” and click on properties

Uncheck the “File and Printer Sharing for Microsoft Networks”

Click OK, and reboot.

How to Disable/Enable the Windows XP Welcome Screen?

Windows XP gives the user a couple ways to log into the computer. You can use the traditional or classic method of typing in the username and password to login or you can use what's called the Welcome Screen to login.

What if you want to change the way your computer logs in, can you disable or enable this Welcome Screen?

The Windows XP Welcome Screen is tied to another feature called "Fast User Switching". This feature lets a user leave all his programs running if another user needs to use the computer. The first user can Log Off the session and Switch User back to the Welcome Screen so that another person can use the computer. When the second person is done, the user can switch back to his profile with all the programs still running where they left off. In order to use this feature, you have to use the Welcome Screen. However, if you dont need or want this feature, follow the instructions below to remove the Welcome Screen.

If you dont want to use "fast user switch", you may want to disable the Welcome Screen. You must be logged in as an Administrator to do this. Note:To do this follow the directions below:

1) Click on Start
2) Click on Control Panel
3) Double-click on User Accounts
4) Click on "Change the way users log on or off"
5) Uncheck "Use the Welcome Screen" (note: this will also disable "Fast User Switching")
6) Click on Apply Options
7) Close the User Accounts window and the Control Panel
8) The next time you reboot your computer, the classic login prompt will be used

What if I dont want the Welcome Screen OR the classic prompt? Can I disable both?

To Login automatically to a user account, follow the instructions below:

1) Click on Run
2) Type in the following command and click OK

control userpasswords2

3) Highlight the user you want to log into automatically, then uncheck the box for

"Users must enter a username and password to use this computer"

4) Click on Apply and you'll be asked to verify the username and password to log in automatically
5) Click OK and the next time you restart your computer, you'll automatically be logged in without having the classic prompt or Welcome Screen.

Is there a utility I can use to accomplish this?

You can download a utility for Windows XP called TweakUI that will allow you to change the way you log into Windows XP, along with allowing you to change alot of other features.

You can download TweakUI for Windows XP from the Microsoft Powertoys web page at

http://www.microsoft.com/windowsxp/downloads/powertoys/xppowertoys.mspx

Another Welcome Screen Issue

If you have recently installed a Netgear WG111 USB wireless network adapter, you might not be able to enable the Welcome Screen or Fast User Switching, click here to solve this problem

About DVI and VGA

The facts

VGA, which stands for Video Graphics Array, has been the standard method for connecting monitors to Macs since the late 1990s and to PCs for some years before then. The newer DVI format, which stands for Digital Video Interface, is the preferred connection method for most non-budget LCD displays, a number of higher-end CRTs, and even a small number of expensive video displays. VGA is being phased out in favour of DVI, although we’re still in the transition period where support for both is common. Some monitors contain sockets for each format, and the Mac mini comes with a DVI to VGA adaptor dongle to help users with older displays connect to its built-in DVI port.

Much of the DVI specifications and its differences from VGA aren’t widely understood. VGA is based on analog signals, at least in terms of what goes across the cables themselves. Although the monitor signal always starts and its life as digital. With VGA systems it is converted to analog as it leaves the graphics card for the purposes of sending it through the cable, then converted back to digital format at the other end, over in the monitor. One drawback of this is the inability to address the monitor’s picture elements - the individual pixels - precisely. This isn’t a problem with CRT displays, as they simply draw out the image as it arrives by passing an electron beam across the inside phosphor-coated surface of the glass screen. It becomes an issue when working with LCD displays, as their pixels are fixed, individual entities which need to have the incoming image pixels matched up to produce a clean result.

The problem this causes with VGA connections is the need to apply phase and clock corrections to synchronise the signal with the display’s physical pixel array and its properties. When this is out of adjustment it can produce banding and other effects for reasons not dissimilar to what causes moirĂ© patterning in printed work; the two different patterned arrays (the virtual pixel grid of the display signal and the physical pixel grid of the LCD itself) don’t match up, leading to regular bands of blurred detail and similar problems. Unlike the potentially imprecise way VGA works with LCD displays, the DVI signal is mapped to the physical frequency of the monitor’s pixels.

The display signal can also degrade with improperly sheilded VGA cables, leading to poorer-quality results at the display end. This isn’t a problem in the same way with DVI, although there is still a maximum recommended length (5 metres) beyond which the signals may not be transmitted properly.

In short, DVI provides a cleaner, faster, more precise display with hardware that supports it properly. This is all very well, but there is a small matter of different DVI formats to content with. Fortunately, these are designed to complement each other rather than actually being competing standards; the differences are essentially to do with handling displays with digital or non-digital inputs.

There are three main kinds of DVI connections which are available; DVI-D, DVI-A, and DVI-I. DVI-D is the ‘true’ digital format. It is the normal format used for connecting digital LCD monitors to DVI graphics cards. DVI-A is the analog version of DVI; it is used to carry a signal from a DVI graphics card to an analog display, for example a CRT monitor. There is a digital to analog conversion applied here, but this still gives higher-quality results than a standard VGA cable. Finally, there’s DVI-I, the integrated format which caters for both digital and analog equipment. This doesn’t convert a pure DVI-D output to something a DVI-A device can use. But it will act as a DVI-D cable or a DVI-A cable according to your needs. The real benefit is that you don’t have to use two different cables if you use both digital and analog displays.

Having said that, you’re pretty unlikely to run into trouble if you stick with the cables that come with whatever new display you buy. Where you need to take care is when buying cables separately. Although you’re unlikely to need anything other than a DVI-D cable when dealing with LCD screens, it could still be wise to consider buying a DVI-I cable to cover both eventualities. However, do be aware that some manufacturers have been making the blade part of the pin set in DVI-I cables larger than normal; this could affect how it fits in some equipment.

There is, unfortunately, still more to the DVI connection format. DVI-D and DVI-I can come in single-link and dual-link forms. Fortunately, again, this isn’t as complex as it sounds at first. The dual link varieties provide twice as much power and deliver the data more rapidly than the single link kind. This has a practical benefit with larger monitors, in that it allows a higher maximum resolution to be transmitted. In compatibility terms, the physical difference between single link and dual link is purely a matter of the absence or presence of extra pins in the middle section of the plug; any DVI-D or DVI-I-ready graphics card can accept either level.


Computers or video?

In the realm of home theatre setups the DVI connection format is becoming popular for making pure digital links between AV equipment. Some feel that the use of this format by the hardware manufactureres is being encouraged by the movie and video industry in place of FireWire because of data copying concerns with that arguably more flexible connection format. DVI can incorporate the HDCP (High-bandwidth Digital Content Protection) copy protection scheme developed by Intel for use with home cinema-level products. HDCP, however, is not relevant to those using DVI for computer monitor interfaces, where DVI is the best choice for modern monitor equipment.

nVIDIA Driver Finder